 |
The Star Wars: Exodus Visual Encyclopedia Wiki Help Guide!
Welcome to the Star Wars: Exodus Visual Encyclopedia, or simply the Exodus Wiki for short. This wiki is meant exclusively as a resource and reference guide for the Star Wars: Exodus roleplaying forum. It is not meant for any other source of fanon (Star Wars or otherwise). To visit the forums, please go here: Star Wars: Exodus. To add your own fanon without being an Exodus member, please use the fanon wiki: Star Wars Fanon Wiki.
With all that said, this page in particular is meant to help out new users to our wiki who may not know how to use the wiki coding to make a proper wiki page. This tutorial will cover the essentials, but we suggest you also take a look at other article pages to see what other members have done.
Thank you,
-The Exodus Wiki Administrators
Creating An Article[]
Creating an article is actually very simple to do on a wiki. There are three basic ways to accomplish this.
- Method One: The Front Page
The first, and probably easiest, is to go the front page of the wiki. You'll find an input box squeezed in between the welcome section and the featured article section.
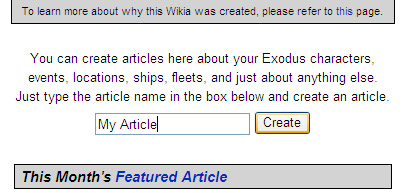
All you need to do is input the name of the article you wish to create there and press the create button. You'll automatically be sent to the new article page where you can begin constructing your article. Once you save your progress, the article becomes part of the wiki.
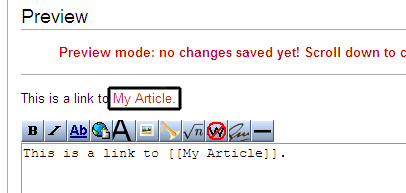
- Method Two: The Empty Link
Perhaps the most common method of article creation is to create an empty link within another article. Saving or previewing the article with this empty link will set up the space for your desired article. Simply click on the red link and begin work on the new article. Save your progress and the new article becomes part of the wiki.
- Method Three: The Negative Search
The third method is to come up with a negative search for a wiki article. If you search for an article on the wiki, but come up with no matches, the wiki will helpfully provide you with an empty link to create that article. Click on the link, save your progress, and the new article becomes part of the wiki.


Basic Coding[]
The Little Mark[]
Your friend in basic wiki coding is going to be this little guy right here: ' (enlarged for better visual).
That tiny little mark will let you bold and italicize words if you put enough of them on either side of a word or symbol. You use the same button on your keyboard to create it as you would to place an apostrophe. It isn't quite an apostrophe though, so let's continue calling it a little mark.
Special Note: The apostrophe button won't work if you import your written wiki code from most word processing programs. The wiki program will assume your apostrophe from that program is meant to actually be an apostrophe and will translate it that way, negating the code. The best way to get around this is to write your code in Notepad or to copy and paste the little marks from the wiki page. Likewise, using quotation marks won’t score you two little marks, they’ll just give you quotation marks no matter how you put them in.
Now you know why the little mark isn't quite an apostrophe. :)
- Italics
Italicizing a word requires two little marks on either side of what you want in italics, like so: This is ''italic''.
In wiki, that looks like this: This is italic
Special Note: it is considered proper grammar to always italicize ship names such as the Millennium Falcon. This isn't necessary for space station names such as the Death Star.
- Bold
Putting words into bold is as simple as adding an additional little mark (three) on either side of whatever you want to make bold, like so: This is '''bold'''.
In wiki, that looks like this: This is bold.
Special Note: For the Exodus Wiki, it is considered proper formatting to always bold the subject of your article the first time you mention it. For example, if you go to the Cadden Blackthorne article, you will notice that Cadden Blackthorne is the first thing in bold.
- Bold Italics
This will not be used as often as the first two, but you may find yourself needing to put a word in bold and italics on occasion (usually when writing an article about a ship (see Starlight Sled). This is as simple as combining the little marks for bold and italics as one (in effect, adding five little marks on either side of a word or symbol), like so: '''''Starlight Sled'''''
In wiki, that looks like this: Starlight Sled.
Headers[]
Headers help you to keep your article from becoming one massive wall of text. The longer your article is, the more essential they become. They also help readers navigate your article since every header you add automatically becomes listed as part of the contents at the top of the page.

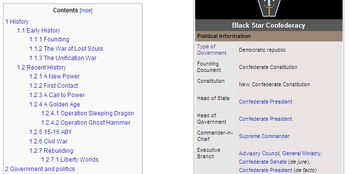
Part of the content links for the Black Star Confederacy page, created with headers.
Headers are created by placing an equal sign ( = ) on either side of the title you want to give that particular section of your article. Just as upping the number of little marks helps you achieve different results with text, increasing the number of equal signs creates different types of headers.
The two largest headers even add "page breaks" to better organize your article.
- Header One
This header should be used to list topics that are very general and non-specific, like "History", or "Sources". It will create a page break.
Thus this... =Header Example One=
Will look like this...
Header Example One[]
---
- Header Two
This header can also be used to cover general topics as it will also create a page break. The only difference is that this header is smaller text than Header One. If Header Two follows Header One, it will be listed as a subsection of Header One under the contents.
Thus this... ==Header Example Two==
Will look like this...
Header Example Two[]
---
- Header Three and Beyond
The more equal signs you add, the smaller the header text becomes. Anything past Header Two will not give you a page break. These smaller headers are ideal for creating subsections within the main subject. In fact, any smaller header under a larger header will create a subsection within the contents area.
In practice there isn't much need to go beyond Header Four or Five.
Thus these...
===Header Example Three=======Header Example Four=========Header Example Five=====
Will look like this...
Header Example Three[]
Header Example Four[]
Header Example Five[]
Linking[]
Linking is essential to a healthy wiki, especially when it's about a universe as interconnected as the Exodus Galaxy or the World of Heroes universe. It allows readers to follow up on articles that relate to yours and get a fuller picture of the stories that happens on the forums.
Basic Linking[]
Linking on a wiki is very easy. All you need to do is place a double set of brackets ( [[ ]] ) around the title of any article on the wiki. For example, if you wanted to link to the Battle of Corellia, the code would look like this: [[Battle of Corellia]]
In wiki, that looks like this: Battle of Corellia.
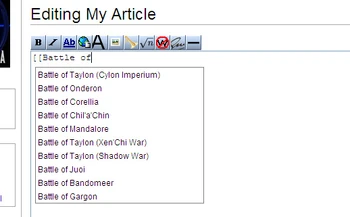
Special Note: If you don’t know the exact name of the article you want to link to, you may be able to find it without searching for it. Simply use one set of brackets and begin typing the name of the article you want to link to. An automatic feature of the wiki will provide a pop-up window that gives you suggestions for the article you’re looking for. The more you type, the more specific the suggestions become. If the article you want is listed, all you need to do is click on it with the mouse and it’ll be placed within your article fully coded as a link.
This can be particularly helpful for articles with long names, or if you can’t quite remember what you’re looking for, or just simply to save some time. Keep in mind that this feature won’t appear unless you keep your brackets open. Placing two sets of double brackets and then typing in the name won’t trigger the pop-up.

Advanced Linking[]
CODE: [[The Link|The Text]]
Advanced linking is not all that different from normal linking. It’s basically a fancy term that means you can create a link with a word or statement instead of the verbatim title of the article. So, for example, instead of directly making a link to the Battle of Corellia, you could refer to it as the “Prelude to the Xen’Chi War” and make that your link. The coding for an advanced link would look like this: [[Battle of Corellia|Prelude to the Xen’Chi War]]
In wiki, that looks like this: Prelude to the Xen’Chi War.
The only difference here is that we’ve placed a divider within the link. This tells the wiki what the link is and what the link should look like. The link is always on the left of the divider, while the part that shows up is always on the right.
Interwiki Linking[]
CODE: [[Wiki:Article Name|The Text]]
If the need comes up to link to other wiki pages that aren’t a part of the Exodus Wiki, there is an easy way to accomplish this without pasting in the entire web address. This is helpful in that it allows you to reference something that may be covered in better detail on another wiki. All wikis should have a form of shorthand that you can use to link to articles on their page.
This is essentially the same kind of format as an advanced link with an extra step. The most common interwiki link on our wiki is going to be for Wookieepedia, so let’s use that as our example. Say you wanted to link to the article on Wookieepedia about Luke Skywalker, the code for that would look like this: [[starwars:Luke Skywalker|Luke Skywalker]]
In wiki, that looks like this: Luke Skywalker
Like an advanced link, the interwiki link is essentially two parts. The left side is for the wiki shorthand and the article name, while the right side is for the text.
Special Note: Interwiki links can be made without including the divider, but they end up looking like this: starwars:Luke Skywalker. The link works, but it’s not nearly as readable as if you had included the divider and the text.
Second Method[]
Some Wikis do not fall under the above procedure. When this happens, you need to use the following code instead:
CODE: [[w:c:wiki:namespace:pagename|The Text]]
An example of the end product would look like this: w:c:marvel:Changeling_(Earth-616). Because you cannot access this page by simply typing [[marvel:Changeling_(Earth-616)]], you need to use this long-hand method instead.
Unfortunately, we do not have a list of Wikis that you can use the shorthand approach with, so the best method would be to preview your page before you submit it to test your link out. A good indicator would be if the link appears red. (marvel:Changeling_(Earth-616), by contrast.)
Naming articles operates under the same way. Using the above example, we can change the name to Changeling.
Outside Linking[]
CODE: [Website Address(a space)The Text]
Outside linking means that you’re linking to a page that isn’t a part of our wiki or any other wiki (and therefore can’t use an interwiki link). On the Exodus Wiki, the most common usage of outside linking is for story threads on the Exodus Roleplaying Forums that relate to the article.
Outside linking is arguably the simplest of the many linking methods. Instead of the double brackets, you only use a set of single brackets. The most important thing to remember is to place a space between the web address and the name of the link. For example, to link to the Exodus Roleplaying Forums the code for an outside link would like this: [http://www.sw-e.com/forum/index.php Exodus Roleplaying Forums]
In wiki, that looks like this: Exodus Roleplaying Forums
As with all wiki links, the address should always be on the right side and the text should always be on the left. Always remember that an outside link won’t work without the space between the web address and the text you use to identify it. That space tells the wiki where the address ends and the text begins.
Categories[]
Categories are an essential way to help keep a wiki organized and easy to navigate. They are a special kind of link that places your article into a page with every other article that shares that category. Think of them as an auto-generating table of contents.
Most pages use multiple categories since they can be applied to several different criteria. For example, the Executor-class Super Star Destroyer can be placed within several categories, it is at the same time a Starship, a Canon Ship, a Supercapital Ship, a Command Ship, a Star Destroyer, and an Imperial Ship. The more categories an article is labeled with, the more accessible it generally becomes.
Adding a category to your article is much like creating a link – with a few notable differences. You still enclose everything within double brackets as you would with a link, but in order for the wiki to recognize it as a category link, it must be prefaced with the word “category” and a colon. For example, to add an article to the Starships category, the coding would like so: [[Category:Starships]]
The other important thing to remember is that while technically you can add in a category anywhere within the coding of an article, the category link will always show up at the very bottom of the page. For this reason, and for ease of editing, category links should be added after all the other coding.
Also, just like links, the wiki will try to pop-up with appropriate categories when you start to add one. This can help you figure out if the category you’re adding exists or not.
Special Note: Many infoboxes and templates on the Exodus Wiki will automatically place an article into a few general, but appropriate, categories once they’re added to a page. Referred to as auto-categories, they are meant as a means to help make it easier to keep the wiki organized. The two most important things to remember about auto-categories are as follows:
1) Infobox auto-categories will only cover the most general of categories that can be applied. More specific categories will be up to the user to add on their own.
2) The auto-categories created from infoboxes and templates will not show up within a page’s coding since they are self-contained within the infobox or template. Removing these features will also remove the auto-categories. Changing them will do the same. To keep the categories that were placed there automatically, they need to be entered manually.
Category Pages[]
Category pages work differently from a normal article page in that category pages, once created, are self-updating. They will automatically keep track of every article linked to them, making them far more up to date and accurate than a list on an article page.
Creating a category page isn’t all that different from creating an article page. In the case of category pages, the most common method is to add a new category to an article and then click on the red link to bring you to that page. However, you can also use the front page method and the search method by placing “Category:” in front of the word to differentiate it from a normal article.
Once at a category page, little is needed to finish it up if you’re creating it, just a simple description of what the category is about and perhaps a link to other categories (See: Categories Within Categories) before saving. All pages linked to that category will then show up automatically.
Special Note: Although the articles that are a part of a category will be displayed in normal view on a category page, when you edit a category page you won’t see them. This is functionally similar to how auto-categories work. The only way to remove or add an article on a category page is to do so within the actual article that has the category. Removing or adding the category on the article will automatically be reflected on the corresponding category page.
Category Organization[]
Categories will automatically add pages alphabetically to a category page based upon what the article is called. This works fine for most articles, but on occasion it can become necessary to better distinguish between similarly named article pages. The most common need on the Exodus Wiki for this involves articles about battles and articles about Force powers. For example, since a great deal of Force powers are prefaced with “Force”, that places every one of the articles named that way under “F” on the category page.
To avoid this, you can assign articles within a category to a specific letter or symbol instead of the default letter the article starts with. The process is much like an advanced link, only with a different result. Create the category, but afterwards place a divider and assign a letter or symbol before closing the brackets. For example, in order to assign Force Lightning to the letter “L” instead of “F” under the Force Powers category, the coding would look like this: [[Category:Force Powers|L]]
The category of Force Powers will still show up properly on the article page, but on the category page, it will be found under “L” instead. This must be done for every category you wish to change from the default alphabetical listing. In the case of auto-categories, the category will need to be input manually. This will override the auto-category.
Categories Within Categories (aka Subcategories)[]
Categories can be organized even further, which is most commonly seen when one category can be linked to another by virtue of the two being of a similar nature. For example, the category Capital Ships can be linked to the main category of Starships. This is what’s known as a Subcategory.
Creating subcategories is simplicity itself. On the category page, you just need to add an appropriate category link. In the Starships example used above, this would be accomplished by adding the Capital Ships category to the Starships category page. Clicking on the Starships category page will then show the category for Capital Ships above the list of articles already linked to the page.
There is no limit to how many subcategories can be within a category and the general rule is that the more broad the topic, the more likely it is to have multiple subcategories. Subcategories can also be organized just like regular category links.
Categories as Links[]
CODE:[[:Category:Category Name|The Text]]
Normally when you add a category, the link to it automatically appears at the bottom of the page no matter where you place it. There is actually a way to make category links function like normal wiki links. It is essentially the same setup used for an interwiki link except that everything stays within the wiki. All you need to do is add an additional colon at the start of the link.
For example, to use the Starships category as an actual link, the code would look like this: [[:Category:Starships|Starships]]
In wiki, it will appear as a normal link, like so: Starships
Special Note: Categories used as links will not place an article within that category. This means that if you linked the Starships category as a link, the article won’t be placed within that category until you add a normal category link.
Redirects[]
CODE: #REDIRECT [[Article Name]]
Redirects are another form of linking that can come in handy for articles that may be referred to by different names. They are basically placeholder articles that will automatically link to a desired article. This is commonly used for shortened versions of article names (like using REC instead of Republic Engineering Corporation), or for characters who might go under more than one name (like Cadden Blackthorne also being referred to as Darth Trayus).
Creating a redirect is a two part process. You’ll need to first create a new article under the name you plan to use as a redirect. Then you need to enter the proper coding to turn the article into a redirect. This is a single line of code. For example, the code for the Darth Trayus redirect page to Cadden Blackthorne looks like this: #REDIRECT [[Cadden Blackthorne]]